
Your Shopify e-commerce store is incomplete without a live chat widget that can humanize the online shopping experience for your buyers. By integrating your Shopify account with a live chat app, you can provide real-time customer support, engage with prospective buyers, reduce abandoned carts, and increase sales. We have handpicked 10 best live chat softwares that can be used for your website.
This post will tell you how to set up your Shopify integration with HappyFox Chat. Before you begin, you need to ensure you have connected your Shopify account with HappyFox Chat by following the instructions from our knowledge base. After installing the Chat plugin for Shopify, you will be able to see the chat widget on your Shopify Store.
Your live chat agents can now do the following actions from right within the agent chat window :
- View the order history of the website visitors..
- See the order status, items, and quantities.
- Fetch shopping cart details of the visitor on your online store.
- See the chat history of the customer.
- View the product page visits of the website visitors.
Now you are all set to take up your first chat with your customer. Here are some simple steps that can get your set up working perfectly.
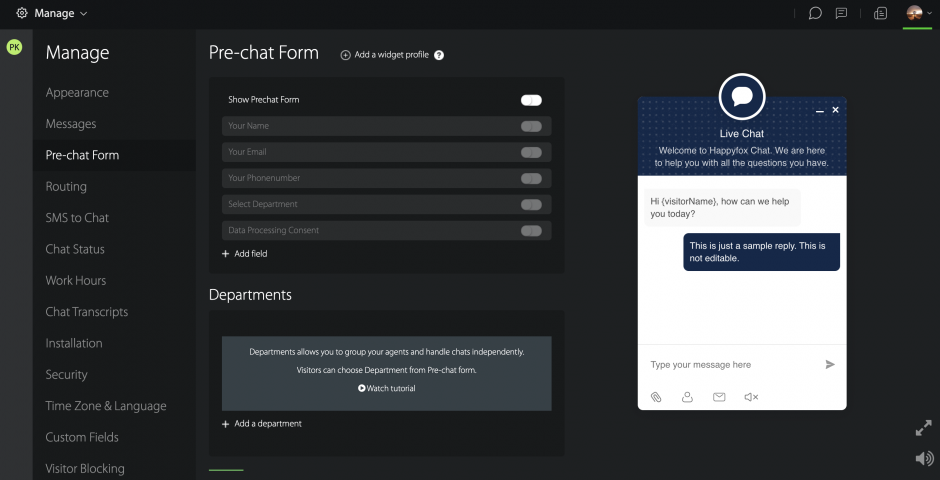
Step 1: Set up your Pre-chat form

The first thing you can set up is the pre-chat form. This form helps you collect information about your store visitor before he gets to chat with your support team. The primary contact information fields in HappyFox Chat are Name, Email, and Phone number. In-built fields like Departments can also be utilized to route chats to the specialized agents.
Once you collect the email address of the customer, the integration between Shopify and HappyFox Chat fetches the order history and live cart details of the customer.
Step 2: Enable order history and live cart information

When you link your Shopify account, you can choose to show the order history and cart information to your agents. By enabling both the settings as shown in the image, HappyFox Chat will fetch the past orders and live cart details of the visitor who initiates a chat.
Step 3: Enable Live Cart information for an unknown visitor

You can disable the pre-chat form if you want to let your website visitors initiate a chat without providing their details. If an unknown visitor initiates a chat conversation, your agents will still be able to see his live cart information.
Step 4: View the order history of the website visitors as you chat.


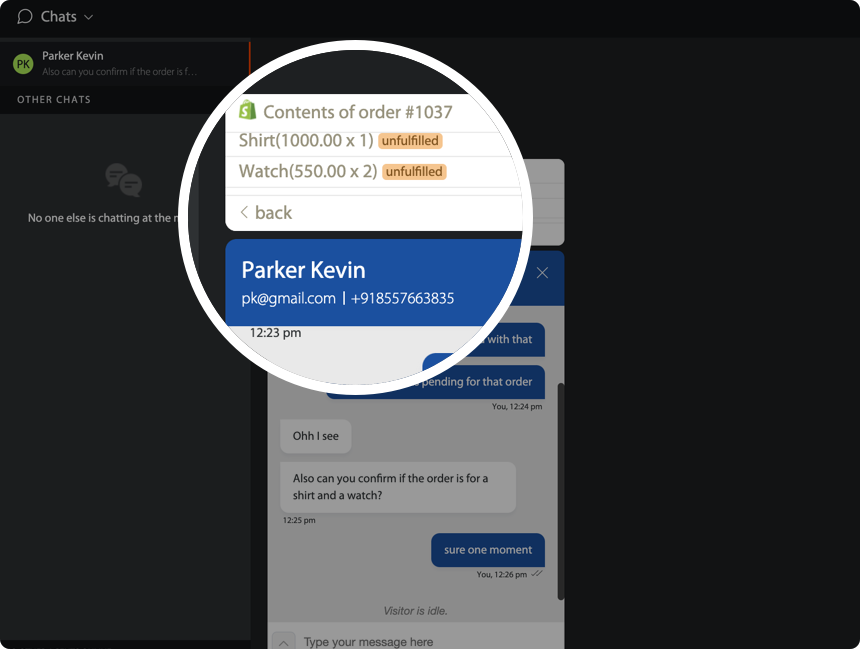
You should now start seeing the order history of the visitors in the chat box during the chat. Upon clicking a specific order, you can also see details like the order id, shipping and billing address, number of items purchased, and payment status of the order.
Your agents can further drill down on the items and see the item name, quantity and price. Support on the go by avoiding back and forth between the store login and live chat, thereby enriching the customer experience.
Step 5: Do a test run to check if the integration is working fine
Finally, do a test chat as a visitor from your website. Enter your contact details in the pre-chat form and check if your sample past orders are getting populated on the chat dashboard.
That’s it! You are all set to get the most out of your live chat widget. Start improving your website conversion rates today. HappyFox Live Chat software integrates smoothly with Shopify. Get to know what HappyFox Chat can do for your business by signing up for a free 14-day trial and enjoy our unlimited agent pricing on all plans.